Our Reglazing Process in Redwood City, CA
Adhesion is the whole game. The step-by-step below is exactly how we prep, etch, prime, spray and cure a fixture so the finish stays put for a decade-plus — not a year.
Mon–Sat 8 AM–6 PM · Free same-day quotes
How we reglaze a fixture in Redwood City, answered
How does bathtub reglazing work?
Redwood City Tub Refinishing masks and ventilates, deep-cleans, repairs chips and rust, etches or scuff-sands for grip, sprays a bonding primer, then lays several thin acrylic-urethane coats and re-caulks. Call (650) 710-4607, Mon–Sat 8 AM–6 PM, for a free quote.
How long does bathtub reglazing take?
Most single-fixture jobs take 3–5 hours on site and are finished the same day. The acrylic-urethane finish then cures 24–48 hours before normal use, and the prep is what makes it last 10–15 years.
The process in numbers
- Across 1,180+ Redwood City fixtures since 2019, 96% were completed the same day in a single visit.
- Most jobs are finished in 3–5 hours — about a 4-hour average — with no demolition.
- The finish cures and is ready to use in 24–48 hours.
- We spray a primer plus several thin topcoats, not one heavy pass.
- A correctly prepped finish lasts 10–15 years; skipped-prep DIY kits last 3–5, and our own warranty callbacks have stayed under 1.5%.
- Seen enough? Reserve your one-day Redwood City reglazing online and we will run this exact prep on your fixture.
- Every job carries a written 5-year warranty; fully licensed and insured.
The seven steps on every job
Whether it's a cast-iron tub in a Mount Carmel bungalow or a fiberglass surround in a Redwood Shores condo, the order is the same. The prep changes with the material; the discipline doesn't.
- Mask & ventilate. We tape off walls, floors, fixtures and trim, hang containment plastic to control overspray, and set up a ventilation fan. Old caulk is cut out and hardware — drain trim, overflow plate, handles — comes off so nothing gets coated that shouldn't be. A clean, contained work area is what keeps the rest of the bathroom spotless.
- Deep clean. The surface is stripped of soap film, body oils, hard-water scale and any failing old coating. On a tub that's seen decades of cleaning products, this also pulls residue out of the pores of the glaze. Nothing bonds to a dirty surface, so this is not a quick wipe — it's a full degrease and strip.
- Repair. Chips, surface cracks, rust spots and gouges are filled with the right compound, leveled and sanded flush. A chip at a tub rim or rust around the drain is built back up so it reads smooth in the finished surface, not as a patch you can feel. We flag any structural crack through the shell here, because that's not something a coating should hide.
- Etch or scuff-sand. This is where the material decides the method. Porcelain and enamel over cast iron or steel get an acid/silane etch that micro-roughens the glaze. Fiberglass and acrylic can't be acid-etched, so they're scuff-sanded with the correct grit. Either way, the goal is the same: tooth for the primer to grip.
- Bonding primer. A tie-coat — a bonding primer or adhesion promoter matched to the substrate — is sprayed to chemically lock the topcoat to the prepared surface. This is the single step hardware-store kits leave out, and it's the reason those finishes delaminate. The primer is the bridge between old fixture and new finish.
- Acrylic-urethane topcoat. Several thin, even coats of acrylic-urethane are sprayed with an HVLP gun in a controlled, dust-minimized pattern. Thin coats flow out and cure evenly; one heavy pass is what causes runs and orange-peel texture. The result is a factory-smooth, glossy white or neutral surface, with a custom color match or a slip-resistant textured bottom added here if you've asked for one.
- Cure & re-caulk. The finish is dry to the touch in a few hours and cures fully over 24–48 hours. We re-caulk the joints with fresh silicone so the seal matches the new surface, reset the hardware, and hand back a warrantied, ready-to-use fixture. We tell you the exact cure window before we leave.
What it looks like in your bathroom
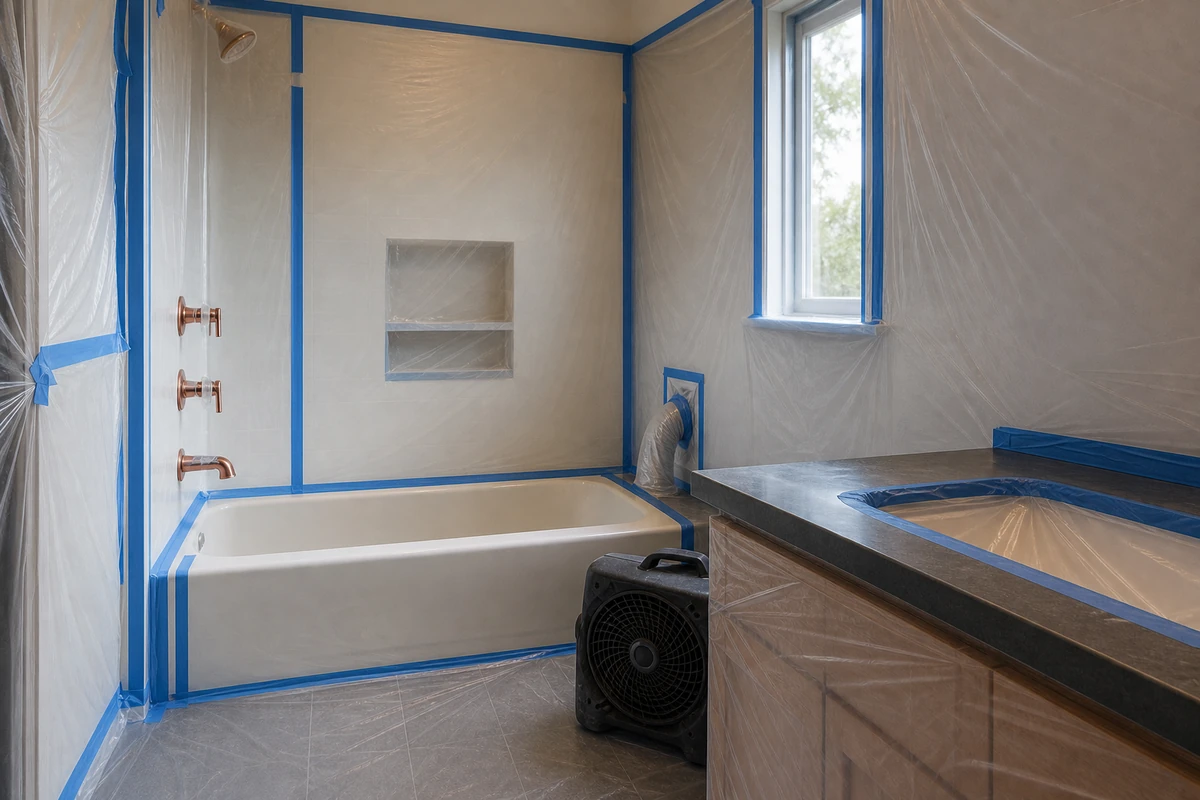
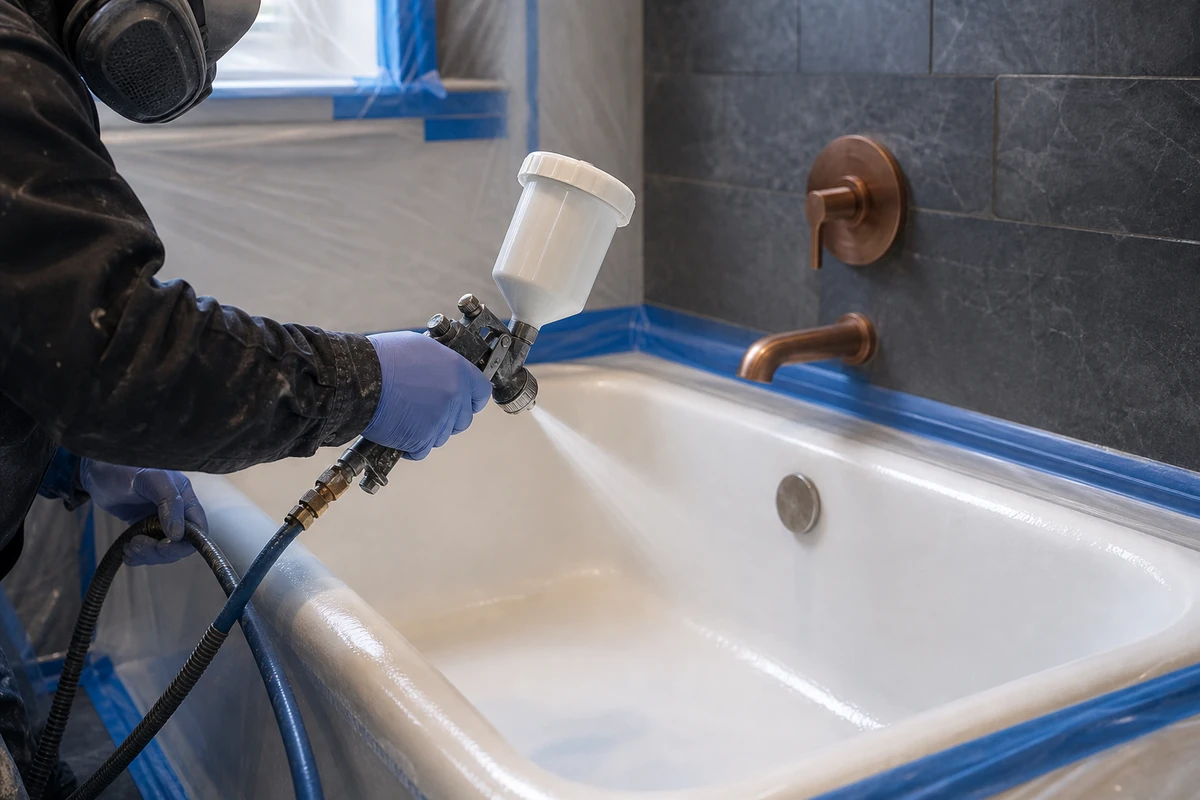
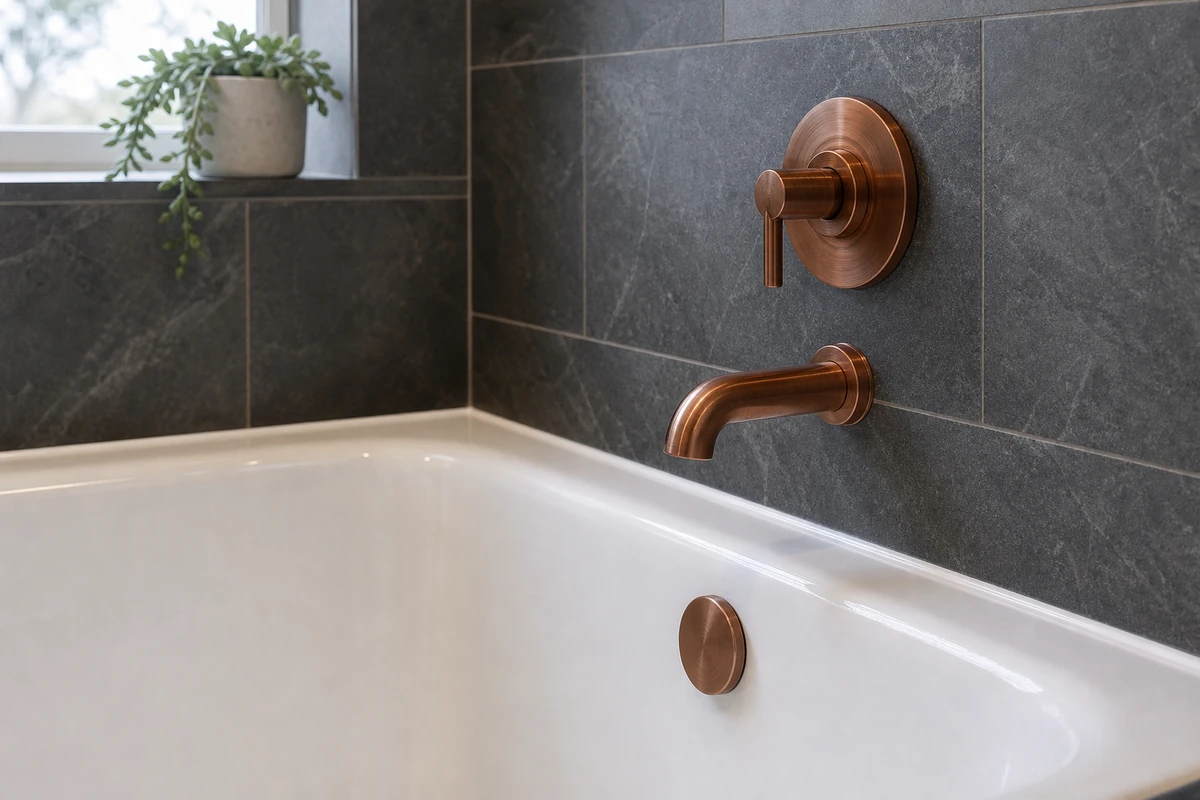
Left to right: masking and containment, the sprayed topcoat going on, and the re-caulked finished tub.
How the prep changes by material
Step 4 is the one that varies. Here is how we route the most common Redwood City fixtures, from pre-war bungalows to newer condos.
| Surface material | Prep method | Typical result |
|---|---|---|
| Porcelain over cast iron | Acid/silane etch + bonding primer + acrylic-urethane topcoat | Factory-smooth, 10–15 yr |
| Porcelain over steel | Etch + primer + topcoat | Smooth, chip-resistant edges |
| Fiberglass / gelcoat | Scuff-sand + adhesion promoter + topcoat | Restores faded, crazed gelcoat |
| Acrylic | Solvent prep + flexible bonding coat | Even color, hides scratches |
| Cultured marble | Repair + primer + topcoat | Removes etching and yellowing |
| Ceramic tile | Clean/etch grout + bond coat + topcoat | New color without tear-out |
How John reads a fixture — and when he says don't reglaze
Before any masking goes up, John White figures out three things: what the fixture is made of, why the old surface is failing, and whether a coating can honestly fix it. Getting the substrate right decides the whole method.
Identifying the substrate
The fastest test is a magnet: it grabs hard on porcelain-enameled cast iron and steel, and does nothing on fiberglass, acrylic or cultured marble. To separate iron from steel, John taps the rim — cast iron rings with a low, heavy tone and barely moves underfoot, while a steel tub gives a thinner, tinnier sound and a slight flex. Weight tells the same story; a cast-iron tub that two people can hardly shift is almost always pre-1970s. Age of the home is a strong tell in Redwood City: the bungalows around Mount Carmel and Centennial usually hide original cast iron, mid-century Farm Hill and Woodside Plaza homes tend toward enameled steel, and the 1970s–80s condos in Redwood Shores and around Friendly Acres are mostly fiberglass and gelcoat. Each one routes to a different prep on the table above.
The real failure modes
Refinished surfaces fail for a short, predictable list of reasons, and John diagnoses by what the failure looks like. Sheet-like peeling that lifts in flexible flakes is adhesion loss — almost always a contaminated or unetched surface, where soap film, silicone or body oil kept the primer from ever touching the substrate. Tiny pinholes or "fish-eyes" point to contamination from cleaning-product residue left in the pores. A finish that stayed soft or wrinkled is a cure fault — wrong mix ratio, too-thick a coat, or spraying in the cold. A glossy coat that simply would not bond evenly usually means the wrong product for that substrate, most often an acid-etch coating used on fiberglass that should have been scuff-sanded instead. Reading which one it is tells him whether a strip-and-redo will hold or whether something underneath has to be addressed first.
When not to reglaze
Refinishing is not the right answer for every fixture, and saying so is part of doing it honestly. A tub with a structural crack through the shell — not a surface chip, an actual crack you can flex — should be replaced; a coating bridges nothing and the crack will telegraph straight back through. A fiberglass floor that flexes like a trampoline needs reinforcing from below first, or it has to be replaced. Severe, widespread rust that has eaten through cast iron at the drain is past a cosmetic repair. And when a fixture is still under a manufacturer's warranty, or it is a high-end acrylic unit the maker offers a refinishing or replacement program for, John will point you back to the manufacturer rather than void it. The before-and-after gallery shows the fixtures that were worth saving; the quote is where he tells you plainly if yours is one of the ones that is not.
Why we spend most of the time on prep
If you watch one of our jobs, you'll notice the spraying is the quick part. The masking, cleaning, repair and etching take the bulk of the visit, and that's deliberate. John White has reglazed fixtures across Redwood City since 2007, and the discipline shows in the numbers: of the 1,180-plus fixtures the shop has refinished since 2019, fewer than 1.5% have ever come back under warranty, and almost every callback he has been asked to fix traced back to prep someone skipped, never to the topcoat itself. A topcoat can only be as good as what it bonds to. Etching gives porcelain the microscopic tooth a primer needs; degreasing removes the invisible film that would otherwise keep the primer from touching the surface at all. Get either wrong and the finish lifts — that's delamination, and it's what we get called to strip and redo after a failed DIY kit in homes from Centennial to Woodside Plaza.
The other half of durability is application technique. Spraying several thin coats instead of one thick one lets each layer flash off and cure evenly, which is what gives the surface its glass-like gloss instead of a textured, orange-peel look. Controlled ventilation and containment keep dust out of the wet finish, since a single dust nib in the final coat is the difference between factory-smooth and merely okay. None of this is exotic; it's just done in the right order, every time.
That discipline is also what makes the price honest. Refinishing a sound tub runs about 50–75% less than tear-out and replacement, finishes in one day, and lasts 10–15 years — but only if the prep is real. See the full pricing breakdown or the before-and-after gallery to judge the results.
Compliant coatings and lead-safe work in Redwood City
Reglazing is a coating trade, and coatings are regulated tightly in California. John White builds every Redwood City job around three things most homeowners never hear about: the product has to be air-quality compliant, pre-1978 surfaces have to be handled lead-safe, and the cure chemistry has to be sprayed with real respiratory protection. None of that is optional here, and it is a large part of why a professional job is safer than a kit on a garage shelf.
Low-VOC, CARB-compliant coatings under Bay Area air rules
We spray acrylic-urethane topcoats that meet the California Air Resources Board (CARB) statewide VOC limits for coatings and the rules enforced locally by the Bay Area Air Quality Management District (BAAQMD) — the air regulator for San Mateo County and the rest of the nine-county Bay Area. (The South Coast district, SCAQMD, covers Los Angeles, not us.) In plain terms, that caps how much solvent vapor a product is allowed to release. Choosing a low-VOC, compliant coating matters in a Redwood City bathroom because these rooms are small and poorly ventilated, so a high-solvent product would load the air far faster than the same work in an open shop. We pair the compliant product with an HVLP (high-volume, low-pressure) spray gun, which puts more material on the surface and less into the air, and we run containment and a ventilation fan to capture the overspray that does come off.
EPA RRP lead-safe work on pre-1978 homes
A lot of Redwood City housing predates 1978 — the cast-iron-tub bungalows around Mount Carmel, Centennial and the Roosevelt district especially — and that is the line the federal Lead Renovation, Repair and Painting (RRP) rule draws. Under the EPA RRP rule (40 CFR Part 745), any surface disturbance in a pre-1978 home has to assume lead is present unless it has been tested out. On those jobs we work lead-safe: we test where it matters, set plastic containment so no dust escapes the work zone, capture debris, and HEPA-vacuum the area before we leave rather than sweeping dust into the air. Old enamel and the painted exterior skirts on antique tubs are exactly where lead hides, so this is not a formality — it is how the prep is done without putting your household at risk.
Isocyanate cure chemistry, Prop 65, and why DIY is riskier here
A two-part acrylic-urethane cures by a chemical reaction, and the hardener side contains isocyanates — the same class of compound that makes automotive clear-coat effective and that California flags under Proposition 65 (the state's chemical-warning law). Atomized into a fine spray in a sealed bathroom, that is genuinely the most hazardous moment of the whole job. John sprays it in a supplied-air or properly fitted respirator with active ventilation, never an open window and a paper mask. This is the single biggest reason a hardware-store kit is riskier than a DIY-er expects: the warnings on the can are easy to underrate, the bathroom has almost no air exchange, and a homeowner rarely owns the right respirator. We carry the gear, the ventilation and the insurance precisely so this step is controlled.
Fully licensed and insured covers the liability side of all of this; the practices above are what keep an occupied Redwood City home safe while the work is happening. For the homeowner-facing version — fumes, pets, kids, and exactly when to leave the house — see is bathtub reglazing safe in Redwood City.
Our warranty and what's covered
Every reglazing job we do in Redwood City comes with a written 5-year warranty on the bonded finish. That covers the things proper prep is supposed to prevent — peeling, delamination and adhesion failure on a surface we prepped and sprayed. If a finish we applied lifts within the warranty period from a workmanship cause, we come back and make it right.
The warranty assumes non-abrasive care: a liquid cleaner and a soft cloth, no scouring powders, no abrasive pads, and no harsh bleach or acidic descalers. Damage from abrasive cleaning, impact, or a suction-cup mat left sitting on the surface isn't a workmanship failure. We walk you through care before we leave so the finish reaches its full 10–15 year life. Redwood City Tub Refinishing is fully licensed and insured.
Questions about care after the cure? The how-long-it-lasts page covers cleaning and lifespan in detail, and the FAQ answers the rest.
Process FAQ
What's the difference between reglazing, refinishing and resurfacing?
They are interchangeable names for the same process: restoring a fixture with a new bonded acrylic-urethane coating instead of a liner or a full replacement. The original tub, shower or counter stays in place; only the worn surface is rebuilt.
What is etching and why does my tub need it?
Etching is an acid or silane treatment that micro-roughens porcelain or enamel so the bonding primer can grip it. Fiberglass and acrylic cannot be acid-etched, so they are scuff-sanded instead. Both create the tooth the primer needs.
How many coats do you spray?
We spray a bonding primer followed by several thin, even coats of acrylic-urethane topcoat rather than one heavy pass. Thin coats cure evenly and avoid orange-peel texture, producing a factory-smooth gloss.
How do I care for the finish after you leave?
Clean with a liquid bathroom cleaner and a soft cloth — never scouring powders, abrasive pads or harsh descalers — and avoid suction-cup mats that trap water against the surface. Cared for this way, the finish reaches its full 10 to 15 year life.
Why do DIY kits peel when your finish doesn't?
DIY kits skip the etch or scuff-sand and the bonding primer, so the coating never grips the surface and lifts — that's delamination. Our prep builds the mechanical and chemical bond the topcoat needs, which is why a professional finish lasts 10 to 15 years and is backed by a written 5-year warranty.
Book your Redwood City reglazing
Open Mon–Sat 8 AM–6 PM. Free same-day quotes, one-day service, fully licensed & insured.